If you’re looking for a beginner-friendly guide on how to launch your first mobile app, you come to the right place.
The HackerNoon Mobile App was also our first jump into the world of app development and we recognize that at first, we were just as lost as you probably are right now. Let us help you get your app off the ground by sharing our own hard-won lessons.
Remember to refer to Apple's and Google's official documentation for detailed step-by-step instructions and guidelines to ensure a successful app submission process.
Table of Links
- A Comprehensive Guide From HackerNoon
- Google Play Store Step-by-step Guide
- Apple App Store Step-by-step Guide
- Release Notes
Google Play Store Step-by-step Guide
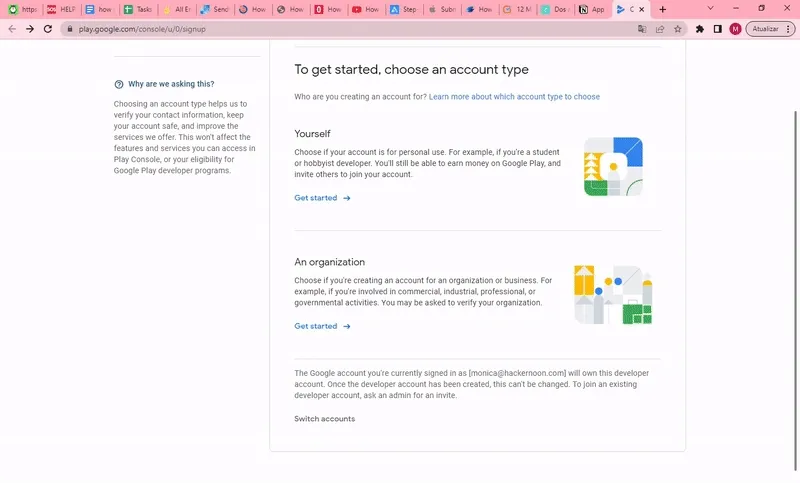
- Create a Google Play Developer Account:
- [ ]Sign up for a Google Play Developer account at play.google.com/apps/publish.
If the app getting uploaded to the Play Store supports in-app purchases, you will need a merchant account. To create one sign in to your Google Play Console account and click on ‘Reports’ followed by the ‘Financial Reports’ option. After this, select the ‘Set up a merchant account now’ option and simply fill out the details.
Demo video:

- Prepare App for Submission:
- [ ]
Ensure the app follows Google Play's Developer Program Policies regarding content, functionality, and design.
- [ ]
Test app on various Android devices, screen sizes, and OS versions.
- [ ]
Handle different device orientations and resolutions effectively.
- Generate App Store Assets:
- [ ] Design an app icon that complies with Google's Icon Design Guidelines (PNG format, multiple sizes).
- [ ] Capture attractive screenshots that illustrate the app's features and interface.
- [ ] Create a feature graphic/banner for the app's main promotional image.
- [ ] Compose a concise, informative, and keyword-rich app title and description.
- [ ] Prepare localized versions of the app's store listing, if targeting specific regions.
- Google Play Console:
- [ ] Access the Google Play Console using your developer account credentials.
- [ ] Go to the ‘All applications’ tab; You will see an option ‘Create Application’ – select it
- [ ] From the drop-down menu, choose the application’s default language
- [ ] Fill in the app's details, including title, description, screenshots, pricing, and availability.
- [ ] Configure in-app products, subscriptions, and any necessary app permissions (e.g., camera, location, etc.).
- [ ] Set up content rating for our app based on the appropriate content guidelines - unrated apps won’t be accepted
Here are all the requirements you’ll need to meet before submitting:
|
Requirements |
Notes |
|---|---|
|
Screenshots |
You need at least one for every supported device screen size. The screenshots cannot contain transparency. |
|
Name |
Name of the app as seen by users. |
|
Description |
A description of your app, detailing features and functionality - here’s a good resource. |
|
Keywords |
Separate keywords with a comma. |
|
Support URL |
A URL with support information for your app. |
|
Marketing URL |
A URL with marketing information about your app, optional. |
|
Privacy Policy URL |
A URL containing your app’s privacy policy, optional. |
|
App Icon |
This icon will be used on the App Store and must be in the JPG or PNG format, with a minimum resolution of at least 72 DPI, and in the RGB color space. It must not contain layers or rounded corners. |
|
Categories |
The secondary category is optional. |
|
Rating |
Generate your rating based on the questionnaire - more information here. |
|
Copyright |
Use the format: YYYY Company Name |
|
Trade Representative Contact Information |
Only appears on the Korean App Store, optional. |
|
Demo Account |
The username and password for a full-access account for your app. Include details for additional accounts in the Notes field. |
- App Review and Release:
- [ ] Submit the app for review through the Google Play Console.
- [ ] Track the review status and address any issues or requests from the review team promptly.
- [ ] Once approved, choose to release your app immediately or schedule a specific release date.
- [ ] Decide whether your app will be available as a free download or if it will be a paid app.
Here’s a guide by @tutorialsEU that helped us better understand the whole process:
https://www.youtube.com/watch?v=DNXME6ANmR4&embedable=true
Developer Program Policies - Key Points to Avoid
- Inappropriate Content: Do not include content that is sexually explicit, violent, hateful, or promotes illegal activities.
- Malicious Behavior: Avoid any activities that may harm or exploit users' devices, data, or personal information.
- Intellectual Property: Do not infringe upon others' copyrights, trademarks, or intellectual property rights.
- Privacy and Data: Handle user data securely, obtain appropriate consent, and clearly disclose your app's data collection and usage practices.
- Monetization and Payments: Comply with Google Play's guidelines regarding in-app purchases, subscriptions, and payment processing services.
- Deceptive Behavior: Do not engage in misleading or deceptive behavior, including impersonating other apps or organizations.
Developer Program Policies - Required Elements
- App Functionality: Your app must have a clear purpose and provide a valuable and functional experience to users.
- User Interface: Design your app's UI/UX to be visually appealing, intuitive, and consistent with Google's Design Guidelines.
- App Compatibility: Ensure your app is compatible with a range of devices, screen sizes, and Android OS versions.
- Security and Privacy: Protect user data, handle permissions responsibly, and follow best practices for app security.
- Monetization: If your app includes in-app purchases or subscriptions, clearly communicate their terms and pricing to users.
- Content Policies: Adhere to Google Play's policies regarding prohibited content, such as violence, hate speech, or adult material.
Remember to refer to Google's official documentation for detailed step-by-step instructions and guidelines to ensure a successful app submission process.

